Installing a Python Environment
This course will use a number of packages that are not included with a standard Python installation. These steps will help you install a Python environment that includes all of the needed packages using the conda package manager.
You may already have Python on your computer, which may be part of an existing Anaconda or Miniconda installation. To make this process go smoothly, it is highly recommended that you start from a completely new installation by following the instructions below. Your instructor has already spent many hours on getting these instructions to work without errors on multiple platforms, so (hopefully) it will work on your machine without any issues.
Before starting installation, you need to have about 20 GB of disk space to download and extract all the packages. Make sure your computer is plugged into power and you have a decently fast Internet connection.
Note: This environment contains the psi4-rt package, which is not available for Windows. If you are using Windows, then you will not be able to use an existing anaconda/miniconda installation, and you will need to follow the instructions below.
Windows
The first step in a Windows installation is to install the Windows Subsystem for Linux (WSL) because that allows us to use the Linux version of software packages. WSL gives you a Linux operating system running inside of Windows, which comes with a terminal that understands Linux commands.
Step 1: Visit the Install WSL page on Microsoft’s website and read the Prerequisites and Install WSL sections.
Check if your Windows version meets the requirements (Windows 10 Build 19041 and higher, or Windows 11). If your version of Windows is not recent enough, you may need to upgrade it before going to Step 2.
Step 2: Install WSL. Open Powershell as Adminstrator and run the command:
wsl --install --distribution Ubuntu-20.04
If it works, you will see several messages appear in Powershell (blue window in the image below), then a second window (Ubuntu, black window in the image below) will pop up.
After a while, the second window will prompt you for a username and password; it is convenient, but not required to use the same username as your Windows account.
After entering your account info, the second window will give you a prompt to enter commands for your new Ubuntu operating system; keep in mind that this is a totally different environment from Windows Powershell, though they look similar.
In the future you can open the Ubuntu command line by running Ubuntu from the Start menu.
At this point it’s best to restart your computer.
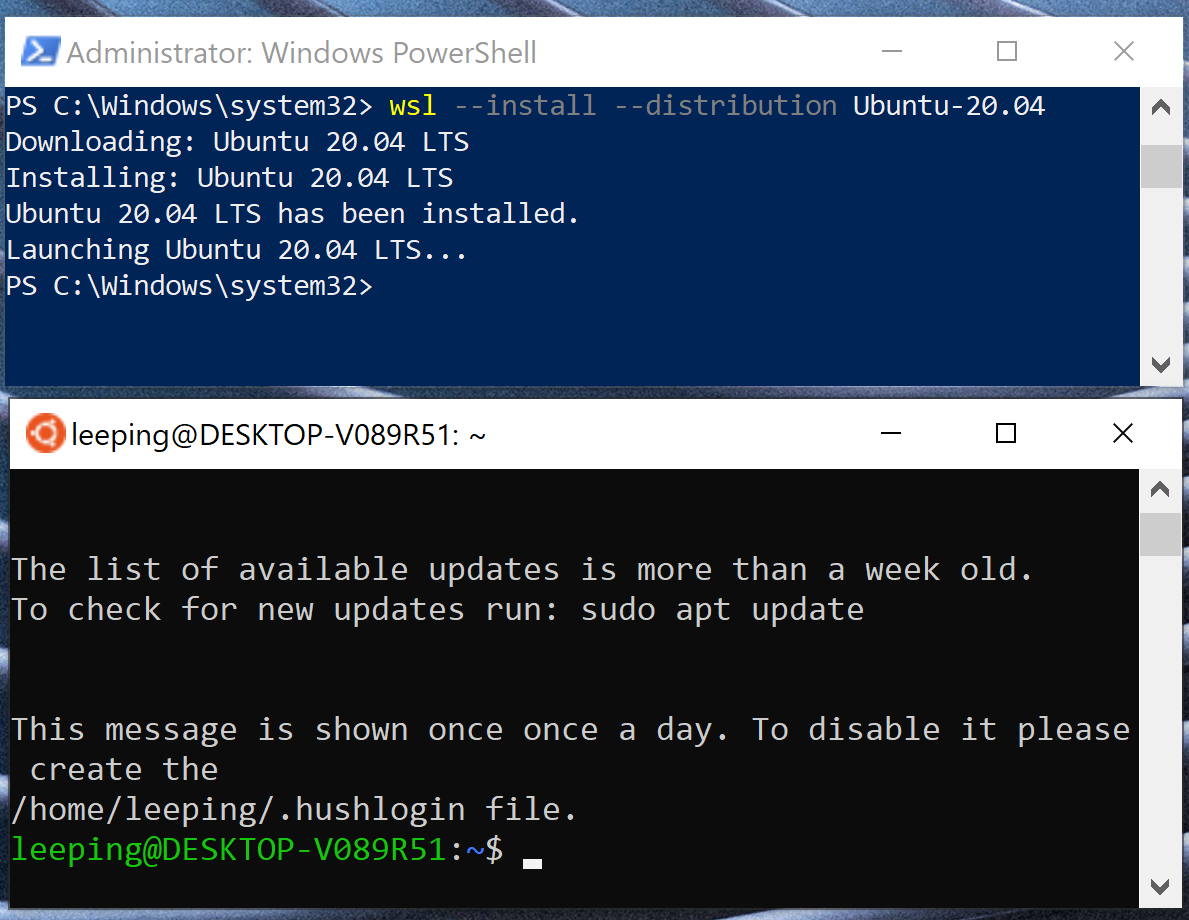
Above: Windows PowerShell (top) and Ubuntu terminal (bottom)
Troubleshooting note: What if you saw the error message, “The Virtual machine could not be started because a required feature is not installed”?
This error has been observed several times over past years on students’ computers and the solution is to enable virtualization in the BIOS (built-in operating system). To enter the BIOS, restart the computer and press the key indicated on the first startup screen you see; this may be Del F2 or something else (you may only have a few seconds to do so). In the menu that appears, find the Virtualization menu item and enable the virtualization options for your CPU (probably Intel or AMD). Then save the settings and exit, and your computer will be rebooted once more. You should no longer see the error when attempting to install WSL.
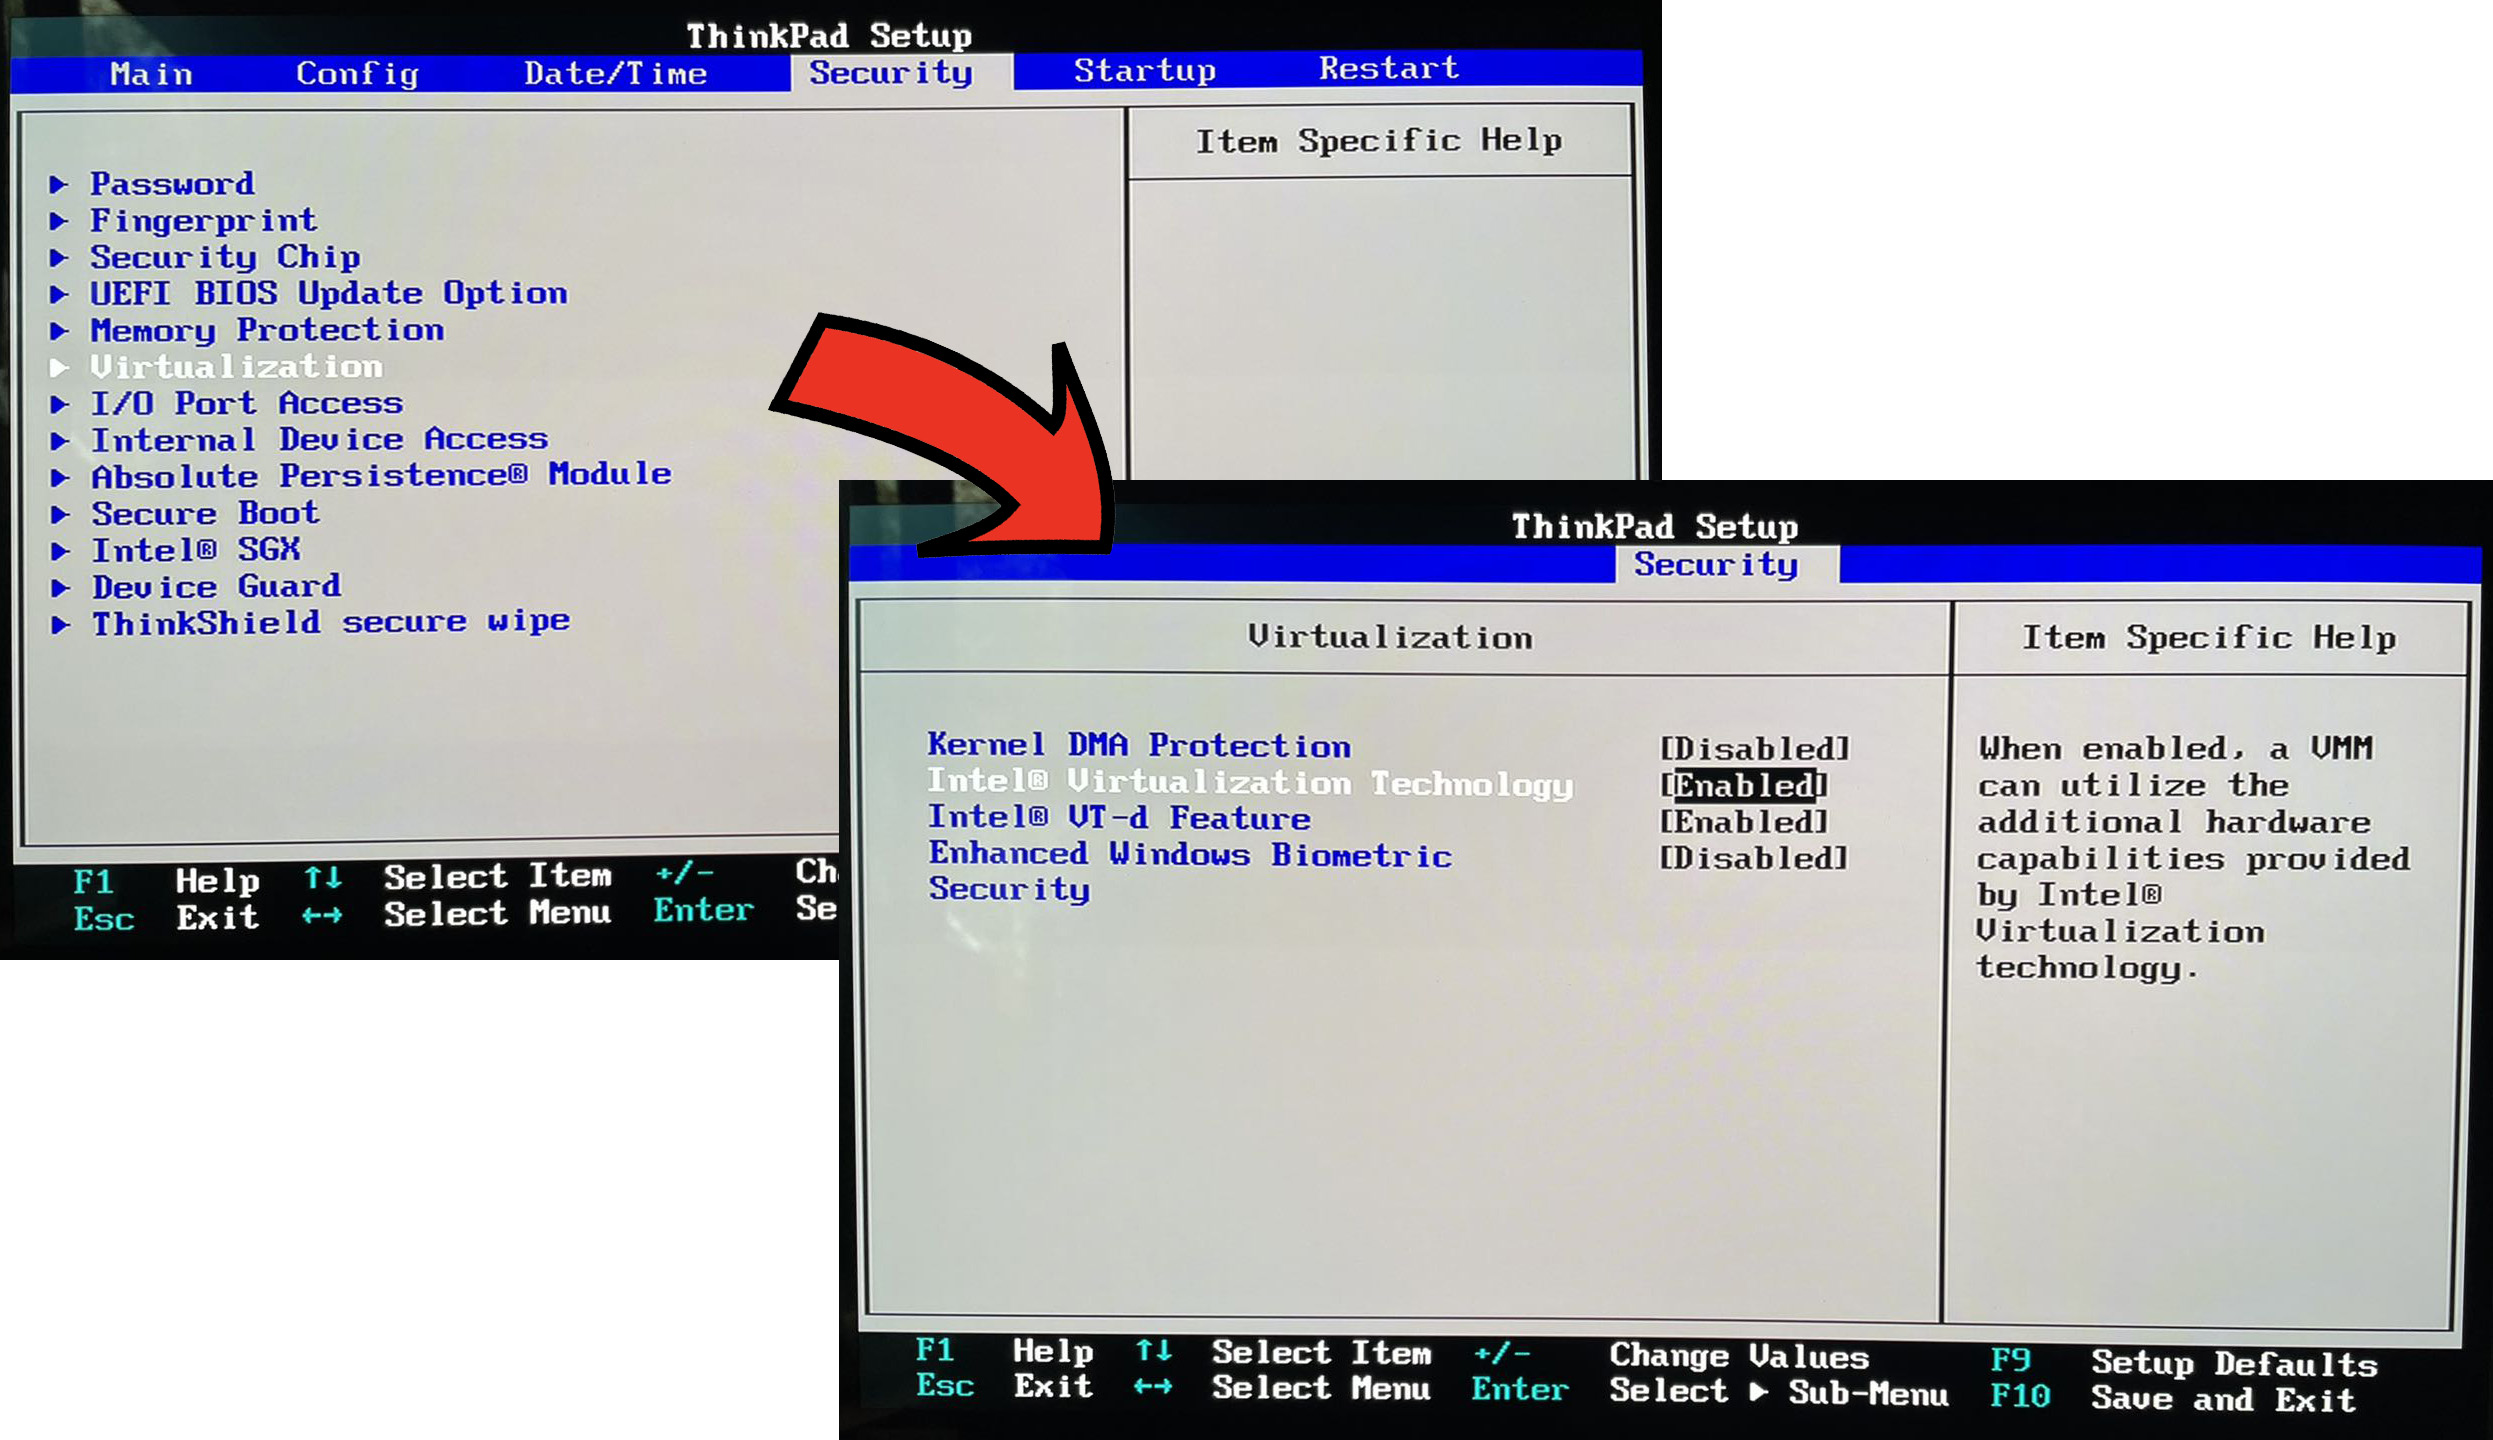
Above: Turning on virtualization on your instructor’s laptop
What is Ubuntu? I thought we were installing Linux? (click to expand)
Ubuntu is a Linux distribution, i.e. one of several operating systems all running the Linux kernel. The kernel is the heart of the OS that manages the computer hardware and all running programs, and is normally hidden from user interaction.In addition to the kernel, Ubuntu comes with various other software components, such as the "bash" shell (i.e. the terminal), the "apt" package manager, text editors, compilers, and many others. It also has a graphical desktop called GNOME but WSL doesn't need it, because your graphical desktop is Windows itself. The package manager allows programs to be installed by downloading them from online repositories.
Because our course is taught mostly as Python codes in Jupyter notebooks, we will mainly be using Ubuntu to run the programs "conda" and "jupyter". You can also use another Linux distribution if you're feeling adventurous. They will have many common features but also important differences (one major difference will be the package manager and repositories).
Step 2a (optional): Install the Windows terminal.
You can get the Windows terminal from the Microsoft store. The Windows terminal allows you to open different command lines (such as Windows Powershell and Ubuntu), but it comes with convenient features such as tabs, a longer scrollback history, cut/paste, customizable colors, etc.
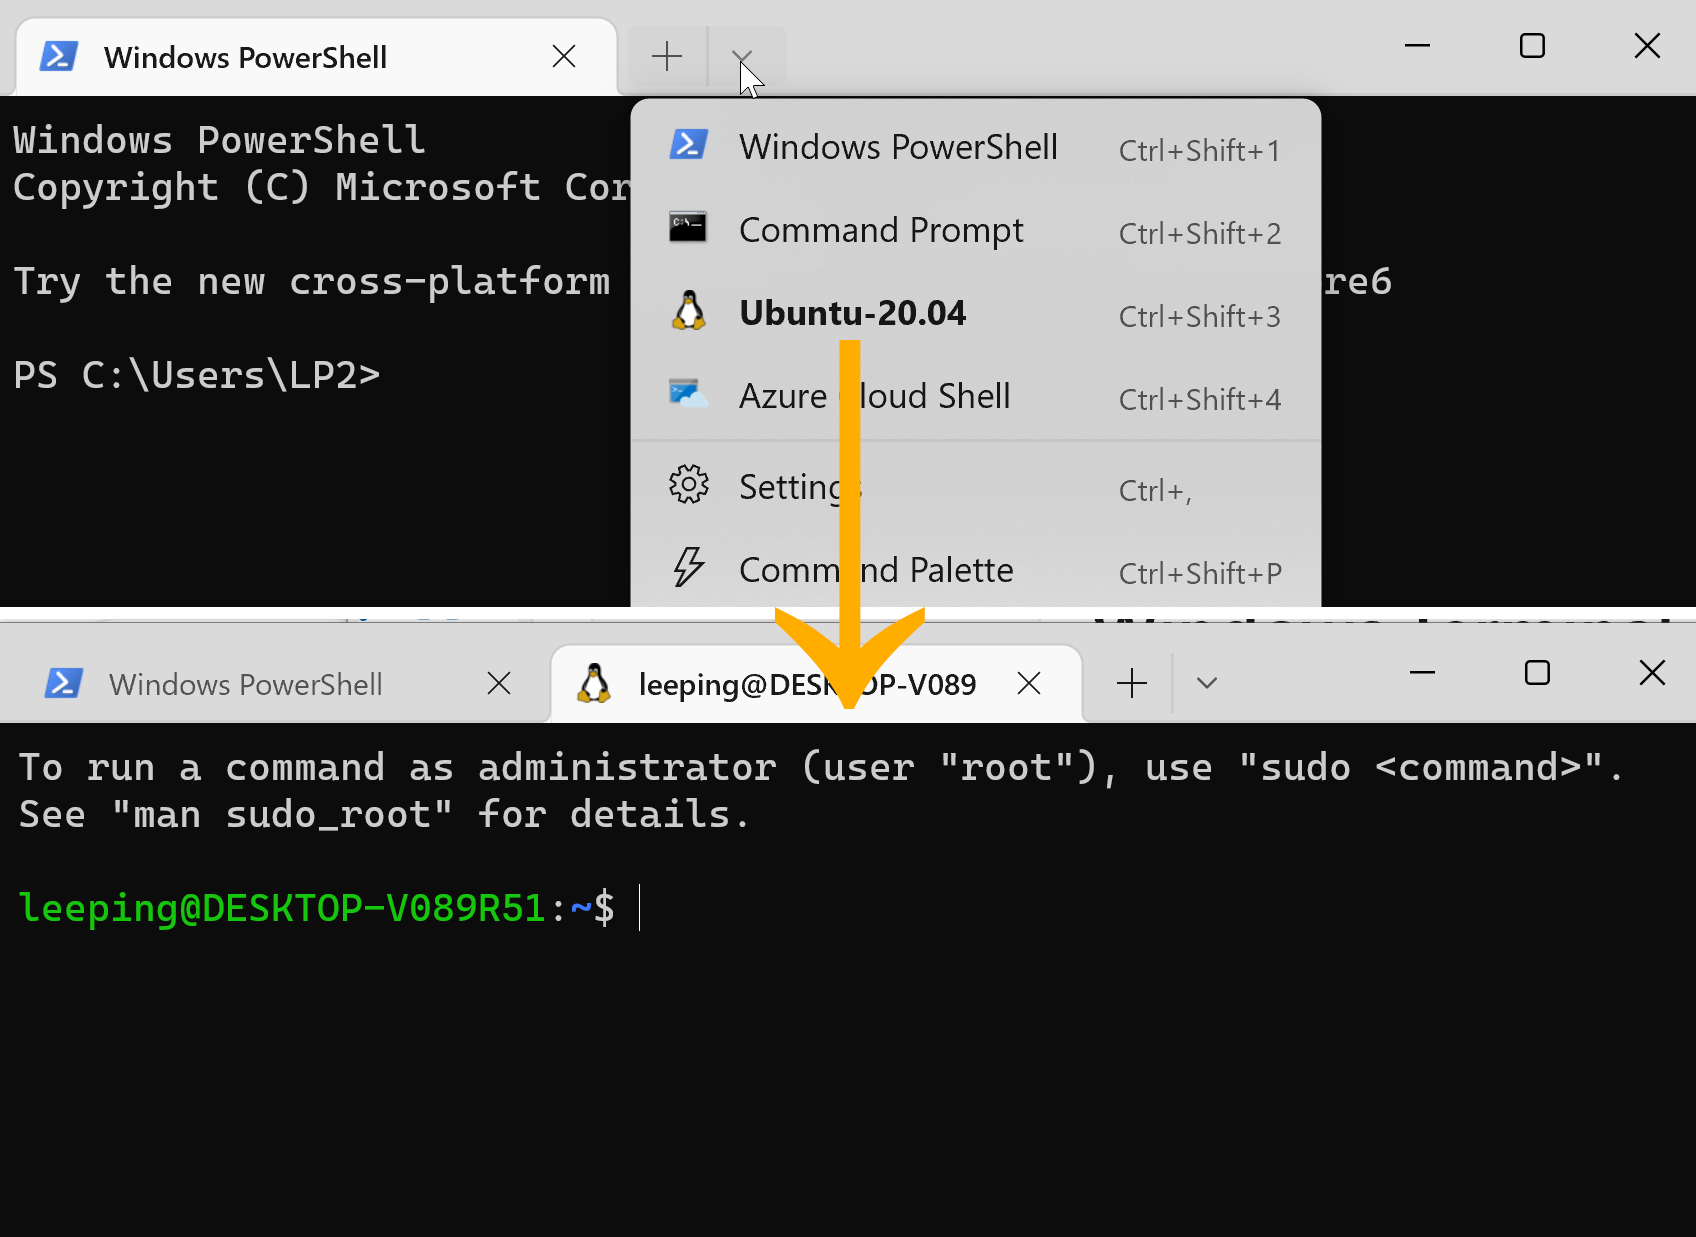
When you open Windows Terminal for the first time, it will give you a Windows Powershell by default (above image). You can open a Ubuntu terminal by clicking the small “⌄” icon in the menu bar. Using the Settings you can also make Ubuntu the default terminal.
Step 3: Familiarize yourself with the WSL filesystem and how it is related to the Windows filesystem.
Your Ubuntu terminal has its own filesystem. In Linux operating systems the filesystem is a directory tree starting with / as the root. Hard drives can be mounted to directories allowing you to work with their contents. (I will often use the terms “folder” and “directory” interchangeably.)
The hard drive containing the Windows filesystem is mounted at /mnt/c/, and your Windows home folder is located at /mnt/c/Users/win_username/ where win_username is your Windows user name.
On the other hand, your home folder in Ubuntu is located at /home/ubuntu_username/ where ubuntu_username is what you provided during the installation.
To access your familiar Windows files, you need navigate to your Windows home directory as follows:
cd /mnt/c/Users/
and look for the folder that matches your username.
However, it is inconvenient to have to type cd /mnt/c/Users/win_username/ every time you want to access your Windows files.
For convenience you may create symbolic links (shortcuts) from your Windows home folder into your Ubuntu home folder.
In the following list of commands, only the first cd and ln -s is essential and the others are instructive:
cd ~
pwd
ls
ln -s /mnt/c/Users/win_username/Documents ./Documents
ls
cd Documents
ls
Explanation of the above commands:
cdchanges directories and~is shorthand for your home folder.pwdprints the working directory, and should show that your current folder (in the Ubuntu filesystem) is/home/ubuntu_username.- The first
lscommand will probably show that your brand-new home folder is empty. (Actually, there are hidden files whose names start with.and are not displayed by default withls, butls -awill reveal them.) ln -screates symbolic links or shortcuts. In this case we are creating a link in your home folder that points to your Windows Documents folder. The./refers to the current folder (the home folder). You can omit it, but I generally like to explicitly refer to the current folder. The secondlscommand lists the files in the home folder and you should now see theDocumentslink. Because theDocumentslink is a shortcut to a folder, you can enter it with thecdcommand. List the folder contents withlsto see your files stored in your WindowsDocumentsfolder.
Note: The actual location of your Documents folder may depend on several factors, including whether you use cloud storage. Generally you can find the Windows path for a folder by clicking on the address bar in Windows Explorer, then the corresponding path in Ubuntu will be something like /mnt/drive_letter/windows_path. You can modify the above steps according to your needs.
Your Ubuntu filesystem is also accessible from the Windows filesystem, but it is not easy to find in Windows Explorer.
To open an Explorer window into an Ubuntu folder, first cd into the folder in the terminal, then enter explorer.exe into the terminal.
A Windows Explorer window should pop up.
You can drag the folder to Quick Access to quickly return to the folder later.
Tip for organization:
To help keep your files organized, you can create a CHE155 folder in Documents in your Windows home folder.
If you followed the above instructions, you should already have a Documents link in your Ubuntu home folder that points to your Windows Documents folder.
For any class-related activity, you can enter the folder by entering cd ~/Documents/CHE155 in your Ubuntu terminal before running jupyter or anything else.
You can also move all downloaded course-related files into this folder.
By making sure all your files are in one location, you can avoid the confusion that comes with having files in different places.
As the folder gets filled up with files, you can create subfolders for different assignments, etc.
Step 4: Your WSL / Ubuntu setup is complete. From this point, follow the MacOS and Linux instructions beginning with Step 1.
MacOS and Linux
The instructions for MacOS and Linux are grouped together because they are very similar in terms of the steps and the potential issues that could be encountered.
Tip for organization:
You can create a CHE155 folder inside the Documents folder in your home folder, then enter the folder using cd ~/Documents/CHE155 before downloading any files.
As with Windows, keeping your files in one place reduces the potential confusion that comes from having files in multiple locations.
Step 1: Download the Miniconda installer. Miniconda is a slimmed down version of the Anaconda Python distribution that includes the conda package manager.
You may download from the Miniconda webpage and download the installer under “Latest Miniconda Installer Links”, or follow the command line instructions below.
For Mac: Download the 64-bit installer for Intel CPUs using the following command:
curl -O https://repo.anaconda.com/miniconda/Miniconda3-latest-MacOSX-x86_64.sh
For Linux or WSL: Download the 64-bit Linux install on the command line using:
wget https://repo.anaconda.com/miniconda/Miniconda3-latest-Linux-x86_64.sh
Note for Apple M1/M2 Mac users: You shouldn’t download the Apple M1 installer because not all of the packages are available for that architecture. Instead, you should run your Terminal in “Rosetta” mode which allows running programs built for Intel CPUs. Do this by going to your Applications -> Utilities folder, right-clicking the Terminal program, choosing “Get Info” and check the “Open in Rosetta” box.
Note for existing Anaconda/Miniconda installations: It is recommended that you carry out a brand-new Miniconda installation and remove any existing installation before proceeding, because that reduces the chance of conda getting stuck in solving the environment. You can remove an existing Miniconda installation by trashing the install folder (the default location is ~/miniconda3 or ~/anaconda3). If you still want to use an existing miniconda installation, skip to step 4.
Step 2: Install miniconda by running the command
bash Miniconda3-latest-MacOSX-x86_64.sh (Mac) or bash Miniconda3-latest-Linux-x86_64.sh (Linux/WSL).
When asked if you want to activate the conda environment, say yes.
Step 3: Close and reopen the terminal program. You should now see (base) in your prompt indicating you are in the base environment.
Step 4: Download the environment file with the command
For MacOS:
curl -O https://leeping.github.io/che155/assets/text/environment.yml
For Linux or WSL:
wget https://leeping.github.io/che155/assets/text/environment.yml
Step 5: Create the conda environment
Note: For several years, the algorithm that Conda uses to solve package dependencies has had a serious problem that it would take extremely long times, making it difficult to use. A new algorithm called “mamba” was recently introduced that is significantly faster, but the newest Miniconda release has not changed the default algorithm yet. Therefore, the algorithm needs to be changed manually.
First update the Conda base executable:
conda update -n base conda
Next, install the libmamba solver:
conda install -n base conda-libmamba-solver
Then activate the solver:
conda config --set solver libmamba
The above steps should be relatively fast.
Now create the environment; this is the longest step as it will download and install all of the third-party packages that we will be using in this course.
conda env create -f environment.yml
The output should look something like this:
Collecting package metadata (repodata.json): done
Solving environment: done (This could take a few minutes, but see me if it takes longer than 10 minutes.)

Downloading and Extracting Packages
libclang13-14.0.6    | 10.6 MB   | ####################### | 100%
xcb-util-0.4.0       | 20 KB     | ####################### | 100%
lcms2-2.12           | 443 KB    | ####################### | 100%
libsndfile-1.0.31    | 602 KB    | ####################### | 100%
json5-0.9.5          | 20 KB     | ####################### | 100%
pygments-2.13.0      | 821 KB    | ####################### | 100%
libsodium-1.0.18     | 366 KB    | ####################### | 100%
prompt-toolkit-3.0.3 | 254 KB    | ####################### | 100%
(Several dozen packages will be downloaded, some with >100 MB file sizes)
Preparing transaction: done
Verifying transaction: done
Executing transaction: done
#
# To activate this environment, use
#
#     $ conda activate che155
#
# To deactivate an active environment, use
#
#     $ conda deactivate
A test run of the installation on several systems took around 10 minutes on average. It is recommended to leave this running in the background; make sure your laptop is plugged in so the battery won’t run out.
Step 6: Activate the new che155 environment:
conda activate che155
Your prompt should now show (che155).
Setup is complete! Move on to Running Jupyter Lab.
ChromeOS
*Note: Many Chromebooks are just not suitable for running a Python environment, particularly those that have very limited hard disk space. It may not be possible to complete all of the coursework with a Chromebook! These instructions have not been extensively tested, so proceed at your own risk.
-
Step 1: Follow the Linux setup instructions on the ChromeOS webpage.
-
Step 2: Open the new Terminal app and follow the Linux instructions.
Running Jupyter Lab
Jupyter Lab is a Python notebook environment that runs in your web browser. The che155 environment that was created during the installation contains the Jupyter Lab software configured with extensions for interactive graphics.
-
Step 1: Open your terminal and ensure the
che155environment is active (conda activate che155). -
Step 2: Run the command
jupyter lab
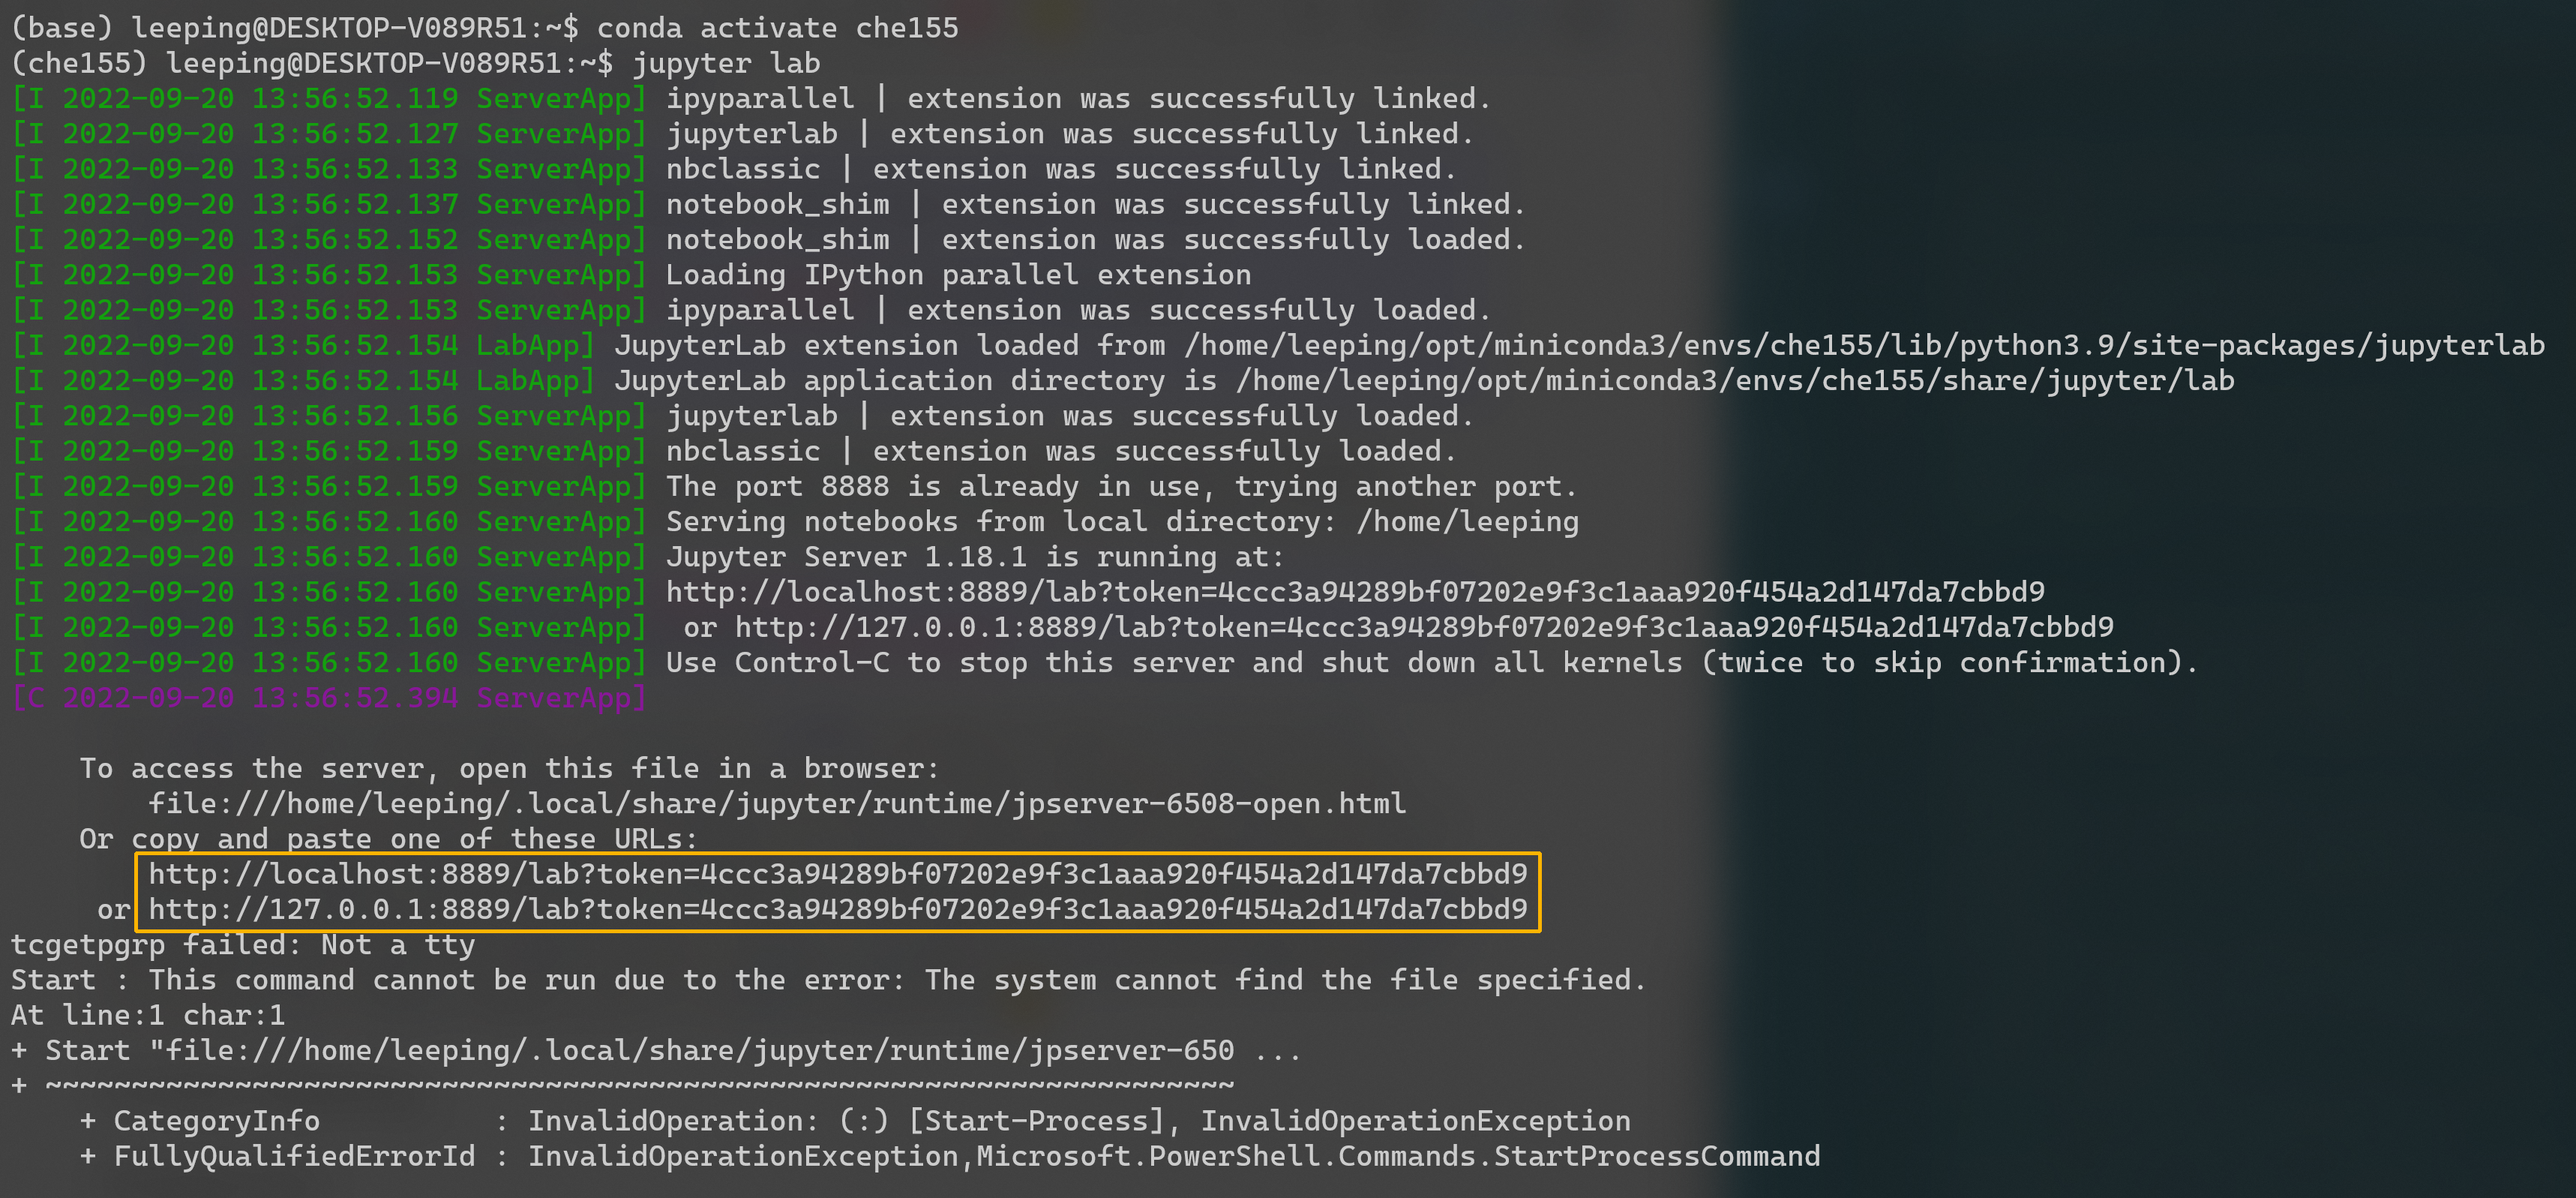
This will spawn a jupyter server instance and attempt to open your web browser. If it does not do so automatically, it will print a URL that you can copy and paste into your browser manually.
If your browser fails to connect to the URL, try this command instead:
jupyter lab --no-browser
Note: The above screenshot shows some warning and error messages. Although they appear to be concerning, they don’t affect the use of Jupyter Lab. To open the notebook, I only need to visited the highlighted link.
Over time, you will become attuned to which warning/error messages are important and which ones are irrelevant. It is one of the most important, yet unspoken-of skills on your journey to becoming a programmer.
When you are finished working, it is best to shut down the jupyter server by choosing File > Shut Down from the JupyterLab menu. Once you have done so, you can close the browser tab and close out your terminal session if desired.
Final note: As most of the instructions on this page refer to installation, you will only need to do them once. However, take note of the actions you need to do repeatedly:
- If you close the terminal or restart your computer, you will need to reopen the terminal.
- Every time you reopen your terminal, you will need to enter
conda activate che155to activate your environment. - After activating the environment, you will need to enter
jupyter labto access your notebooks. If you close the terminal, it will stop the notebook server and the notebooks in your browser will no longer work. - Avoid running
jupyter labin multiple terminals (e.g. if you leave one running and start up another one in a different terminal). Having multiple notebook servers running could lead to issues such as file access errors.